I roasted a chicken today, which always gets rave reviews. Unfortunately, I used my last envelope of onion soup mix, so next time I'm going to have to find a new way to season it. But the real jewel of the meal today was the scalloped potatoes. I made them once, a LONG time ago... back when we still lived in the casita, so at least 4 years past. I'm not sure why I waited so long to make them again. The Peruvian papas rosada (pink potato) are perfect - they cook well, and have a soft, creamy texture that goes well with the sauce. Here's how I made it.
5-6 large potatoes - enough to fill a 2 liter (2 quart) casserole 1 small onion 50 grams (about 3 tbsp) butter 30 grams (1/4 cup) all-purpose flour 350 ml (about 1-1/2 cups) chicken broth 30 ml (about 2 tbsp) mayonnaise Salt and pepper
Peel and slice the potatoes in very thin slices - helps if you have a mandolin slicer. Cut the onion in half, peel and also cut in very thin slices - as thin as you can get them.
Grease your casserole dish and layer the potato and onion slices with salt and pepper. Don't be shy with the salt and pepper.
In a saucepan, melt the butter.
Add the flour, and stir until it's a smooth paste.
Add the broth, and whisk, whisk, whisk!!! You want it smooth with no lumps.
Add the mayonnaise, and keep whisking until it gets thick and just starts to bubble.
Pour the mixture over the potatoes. Cover, and put it all in a pre-heated 350 degree oven. (175 Celsius) Let it cook for about 1-1/2 hours.
This is SO good. I'm a dolt for not taking a picture, to show you how delicious this looked. I sprinkled some paprika on top. You might try adding some chives, or maybe some chopped ham layered in with the potatoes and onions. Or sprinkle some cheddar in there.
I bet it wouldn't be hard to make this vegan, either.
This is easy and really filling. Give it a try, your family will love you.
This week has been lovely - the first signs of spring in the air. The sun has been out for a few hours every midday, which is a welcome change from the constant grey skies that are typical of Lima winters. The birds have been going crazy out in the huge bougainvillea behind my house - it's full of all kinds of little flying things. Lots of flowers blooming, too - my hibiscus has the prettiest triple yellow blooms.
Still cool in the evenings, though, so I'm still cooking food that's comforting and warming. Last night, I made a pork/broccoli/cauliflowerstir fry. I started with the biggest stock pot I have, and the water on to boil because I was going to be cooking a pound and a half of spaghetti. I put about 2 tbsps of salt in the water, and a glug of oil. I'm not going to get into the discussion of whether salt or oil is necessary when boiling pasta... but I use both. ;)
While I waited for the water to boil, I took my pork tenderloin out and started cutting it up into very small cubes - no bigger than 1". Then, same thing for a half a head of broccoli and a half a head of cauliflower - small, bite-sized florets.
By the time I got all that good stuff chopped up, my water was boiling and I added my spaghetti. I took out my big old saute pan, added some oil, and started searing the pork. I sprinkled some Aji-no-Moto on - that's MSG - and a little bit of salt. Once the pork was seared, I dropped in the cauliflower. About 2 minutes later, I added the broccoli. I sprinkled on some powdered ginger - about a teaspoon. Then I added about a cup of soy sauce and a tablespoon of white vinegar, stirred it all up, turned off the heat and covered.
Now, the spaghetti was done, so I drained it in the colander. Then, last step! I dumped all that pasta on top of the meat and veggies and stirred it all together with a bamboo spoon. Taste it and adjust what you think needs adjusting - a little more soy sauce? salt? ginger? Maybe a little chinese five-spice, or some red pepper if you like it spicier. It's all up to you.
Sorry about the looooong absence. I had family visiting from the US, as I said below. Then - my keyboard stopped working. I can't begin to tell you how annoying it was to not have a U, I, O or P on the computer. Nearly impossible to type, unless 1 wanted everyth1ng t0 l00k l1ke th1s. (that's ones and zeroes thrown in - and there's NOTHING that substitutes for P!) So anyway... On with the eats!
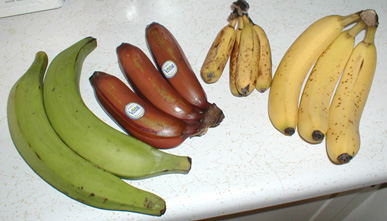
I haven't been cooking much lately, as the boys aren't spending a lot of time here at home during summer. But I have gone back over my small amount of archives, and been reminded of a few things I wanted to talk about. So today - let's talk about plantains. Plantains are called platanos in Spanish, and that's how I'll be referring to them here. There are many different types of platano available in Peru from the small, silky bizcocho to the larger, orange-fleshed platano isla. Here, the typical American style of banana is called a platano de seda - silk plaintain. My favorite cooking platano is the platano isla - it's very sweet when ripe, and has a firm flesh that holds together well when frying.
There are many different cooking styles for plantains - boiling, frying, baking. If you've had fried plantains in a Cuban or Puerto Rican style restaurant, you probably had tostones which are green platanos sliced in rounds, and fried, then flattened and fried again and sprinkled with salt. What is more popular here in Peru is a style called platanos maduros which is a sweet dish made of very mature plantains. You can see them in my earlier post on Arroz a la cubana.
So... the how do you cook them? Well, nothing could be simpler! All it takes is a large skillet, oil and very ripe platanos. The riper, the better - some people let them get completely black-skinned. I prefer them at the stage where they're starting to get some large black spots - I find it makes them easier to handle while frying. I use soybean oil for most of my cooking, but I'd love to try peanut or sunflower oil for this sometime.
First, peel the platanos, and cut them length-wise in planks. If the fruit is very ripe, I'll just cut it once, in half. If it's a little firmer, I'll cut it in quarters. Add enough oil to your skillet to come halfway up the slices of platano. Get the oil very hot, but not smoking and carefully put your sliced platano in. When it starts to get a little brown around the edges, flip it over - I find it easiest to do with a fork. When both sides are brown and caramalized, take them out of the pan and drain on a paper towel.
That's it! They're delicious as a side dish, especially alongside rice. But I've also found they make a delicious desert, topped with a scoop of vanilla ice cream and some manjar*.
Tip - If your fruit is very long, you may want to cut the planks in half, so you have shorter pieces to work with - makes it easier to flip while cooking.
*What is manjar? It's a thick sauce made of cream and sugar - like a very cooked down version of sweetened condensed milk - with a slightly caramel flavor.
I live in Peru, and a lot of things I took for granted when cooking are either not available or are so expensive they just aren't always worth buying. One of those things is canned tomatoes. They're here, but they're too expensive to use as a regular ingredient. So, I started using regular ripe tomatoes a lot more often, and it's actually so easy, I've come to prefer using them over the canned for most things. Here, then, is my way of preparing my tomatoes.
I start with a glass casserole dish (2 quart). Add water to nearly fill, then put the top on and stick it in the microwave long enough to get the water just to boiling. CAREFULLY remove it from the micro! While the water nukes, take your tomatoes and cut a X-shaped slice in the bottom of each one. (Of course, you can always do this on the stove top in a saucepan- I prefer the microwave because I have a super tiny stove, and am usually cooking other things while I do this)
Again, very carefully, using a spoon, lower the tomatoes into the water and leave them for about 30 seconds or so. Doesn't matter if you leave them longer, since usually you'll be cooking them later anyway. Take them out, run them under cool water so you can touch them, and then peel the skin off, starting at your little X-slice. You'll find the skin will slip right off.
Once you've got your tomatoes peeled, it's a simple matter to just crush them by hand and clean the seeds out of them. If you want, once you have the seeds out, use a knife to cut up the bigger pieces.
And there you go, fresh tomatoes, peeled and deseeded and crushed, ready to add to your recipe. You can add this to soup recipes in place of canned tomatoes. Just remember that you'll need to adjust seasonings, because this won't have any of the salt or other seasoning that canned tomatoes often have.
Despite waking up late, I made grill cheese sandwiches and hot chocolate for the boys for their breakfast. I thought with exams starting today, they needed something a little more substantial than cold cereal.
Even though it's full on late spring here in Peru, my family loves eating home made soup. I decided to nourish that love today with some Lentil Soup. Man, is it tasty. All the 'flavor' ingredients here can be tweaked as you see fit - use more bacon if you like! I don't use a recipe or measure, so all this stuff is 'pretty close'. Nothing has to be exact! Close enough is close enough. ;)
1 tbsp olive oil 4 slices Bacon, cut up in 1" pieces 1 lb kielbasa or similar smoked sausage (1/2 Kilo) 1/2 cup diced onion 3 carrots, diced 1/2 tbsp basil 1/2 tbsp garlic (or crush a couple of fresh cloves) 2 bay leaves 2 cups of dried lentils 6-8 cups water 3 italian (plum) tomatoes - peeled, deseeded and crushed or coarsely chopped. 2-3 tbsp tomato paste 1/2 cup spinach, in thinly sliced Salt/Pepper to taste
Around 6 servings It's a good idea to have everything cut up and ready before you start.
1) Start with a 5-6 quart soup pot or stock pot. Mine looks similar to this: 2) Over medium high heat, put in the olive oil, the bacon, and your sliced up sausage. Cook for a couple of minutes, until the bacon starts to look 'cooked'.
3) Add the onions and carrots, then cook, stirring occasionally, until the onions start to become transparent.
4) Toss in the basil, garlic, bay leaf and cook for another 2 minutes, making sure to stir everything together.
5) Dump in the lentils and tomatoes, and enough water to cover everything + a couple of inches extra.
6) Cook on high heat until it comes to a boil, then lower the heat to a simmer. Leave simmering for at least an hour. I cook mine a couple of hours, because I like my lentils sort of disintegrated. Add more water if needed.
7) Add the tomato paste, and gently stir to blend it into the soup.
8) Taste it - add salt as needed. I don't want to give a specific amount, because it depends on your taste and how salty your bacon and sausage are. Here in Peru, the bacon isn't super salty, and neither is the sausage I use. I ended up using about 4 tsps of salt. Add pepper if you like that sort of thing. ;)
9) Right before serving, add the spinach and stir until it's wilted.
Enjoy this delicious soup! And don't eat the bay leaves ;)
Some changes you can make: -Try using bacon flavor cubes (like chicken bouillon cubes) instead of bacon to cut a little fat. -Instead of tomatoes and tomato paste, stir in 1 can of diced tomatoes. Hunt's has some good flavored diced tomatoes that can make some really subtle but tasty changes to the flavor. - Leave out the meat completely and use vegetable bouillon cubes for flavor to have a really hearty vegetarian meal. - Cook it down to a thicker stew consistency, and serve over your favorite rice for a complete meal.
I'm really sorry I don't have pictures of this, but my camera has decided to stop working. Sometime after the new year, I'll get that taken care of and start putting pictures of all the food we eat.
My husband cooked up some bacon this morning, and woke me up with a yummy bacon sandwich on potato bread. With a glass of fresh made lime-ade. Yum, and that limaid sure felt good on my sore throat.
For lunch today, I made what I consider 'white trash' cooking. My definition of white trash cooking includes anything where the majority of the ingredients come from boxes or cans - quick and easy, tastes good, not always low-fat/low-sodium ;) My boys love mac n cheese, (like most kids their age) so I decided to make a meal based around that. Armed with two boxes of regular Kraft Macaroni and Cheese and a 1/2K (appr. 1lb) of very lean ground beef, I set to making some cheeseburger macaroni.
(enough for a family of 4)
2 boxes Mac/cheese dinner 1/2K ground beef 1 tsp chili powder 1 tsp seasoned salt 1/3 cup ketchup
1) Start your water boiling - you want want to use a large pot, since you'll need to boil 2 boxes of noodles. I used about 4 quarts of water - don't forget to dump a big pinch of salt in, and about a tbsp of oil. Put your noodles in when the water starts to boil. Remember, DON'T cover a pot of noodles while it's cooking, it'll make it boil over.
2) While the water's coming to a boil, put your hamburger in a large deep skillet over medium-high heat. Add seasoned salt and chili powder and stir with a wooden or nylon spatula, breaking it up into small crumbles as it cooks. Drain the grease if there's a lot, then add the ketchup and stir well. (If you use a very lean ground beef, there's not going to be enough grease to worry about)
My skillet looks like this:
3) Noodles should be done or near done by now - you want them 'al dente', not mushy - about 8 minutes at a full boil. Drain the water out using a colander or strainer.
4) Dump the noodles on top of the cooked ground beef. Dump in both packets of cheese powder, 3 tbsp butter, 1/2 cup of milk.
5) Using the flat side of the spatula GENTLY mix everything together until the cheese powder is all incorporated and everything is well mixed. You don't want to stir it too vigorously, you'll smash up your noodles and make it all mushy.
That's it - and it tastes pretty much like a cheeseburger.
I served it with corn on the cob via the microwave. If you have fresh corn, break the ears in half, put them in a glass casserole with about an inch of water. Put the top on, and stick it in the micro for 5 minutes. Turn the corn over half way through the cooking. After the 5 minutes is up, check - depending on the size of your corn, you may need another minute or so. Usually, leaving it in the casserole with the top on is enough steam to finish it up.
This was a great little blog while it lasted, but we needed more! So we've moved the whole kit'n caboodle over to My Life in Peru. We hope you'll come and join us over there for more madcap adventures and delicious Peruvian foods.
I got tired of life happening while I made other plans, so I quit my job and came to Peru. I live here with my Peruvian husband, two sons, three dogs and various other family members, depending on the weather.
If you click on or purchase from one of the advertisers displayed on these pages, it helps me to keep this site going. Thanks!

![Reblog this post [with Zemanta]](https://lh3.googleusercontent.com/blogger_img_proxy/AEn0k_umr9vnEZ9P1geTAKOpr3mRqs3364u6fysDFhMn0rXSciRFpFfZDQAa_-PSOJRn1qo4AGP0-_XqOfl39Kup3u-R5312l6RXv8o0M3yMcMv_G2u6mKZcPXCB1a-yhoIa5sdYkOYKbPgTqJecilDnw1ll=s0-d)


 , added some oil, and started searing the pork. I sprinkled some Aji-no-Moto on - that's MSG - and a little bit of salt. Once the pork was seared, I dropped in the cauliflower. About 2 minutes later, I added the broccoli. I sprinkled on some powdered
 ![Reblog this post [with Zemanta]](https://lh3.googleusercontent.com/blogger_img_proxy/AEn0k_tRzPeh3z7Iei_wO5AA1kMW27z6zu0O19XKf498n1uFbONLStA3gkzfuyqJ4qKPIyuvR_qkhGwbz8OWsWxptOHUsoujsEuFxB3XAjvmULckgkK5qPE-zxtpXe3YfJPNch4BlfkPV22J1OxALQxThBWq=s0-d)

![Reblog this post [with Zemanta]](https://lh3.googleusercontent.com/blogger_img_proxy/AEn0k_sLxvAMmMR027TMGMdO9TL7WPaiW5SMgHyER6HKAoYOFAA5dy8Nq7ZP6UjzDws7OEOUc33qBP05Vj0L7jLFMQr7L2uSZXA5EMI7XP2uncZtj0zY0pUjTSi_KFH7Ng8kJq4aR4HuDfS2WfhfrqS42G5T=s0-d)

![Reblog this post [with Zemanta]](https://lh3.googleusercontent.com/blogger_img_proxy/AEn0k_u-wYsLI5YonvJN_fQNiaxzizW3HQkcHIPWYac5Yj2IfrFNutKt9qEM_-RbmSZ8pRNaCvlrjw-YWcxqJIPM9HmveEgXSCECy6hJRzmd9Oxjp68p_PQ2VLBoxL70uT58bYGK_LkVUgKeXuHemseMCJc8=s0-d)


![Reblog this post [with Zemanta]](https://lh3.googleusercontent.com/blogger_img_proxy/AEn0k_vxFtM03qF6bBW7MaXfkOO3xj3KP9ceprgm-Mp7dxYf1cPx65Ye_ZruaNcu43sKcVZTp4RXXJpn42mC-jWnZSYayT22mQ18iAA4HyA-vFKaxbIuDMzaVrjpkdCwe8CHNxQJMtKeE0K1iNP7K9EJ6MzA=s0-d)


![Reblog this post [with Zemanta]](https://lh3.googleusercontent.com/blogger_img_proxy/AEn0k_taj90wkhRlJcOMFesw7Y1etE4fNbZhEr0GBi-r5jEoTXo-RuuxDCApYd_7yEBA2sdL0dDtTqC1XHdRh177zvP1SeeKmQjpRCKWCw-U5K113bXQxI15XjLffpuY8iHrc2ruww03RrX76eP2Mx5VjLY=s0-d)


 Posts
Posts


